

Introduction
In this tutorial, we will guide you through creating a DIY Gas Alarm system using an Arduino and the MQ2 Gas Sensor. This project is ideal for anyone interested in science experiments, DIY electronics, or even those preparing for a science exhibition. The MQ2 sensor can detect a variety of gases such as methane, butane, propane, and smoke, making it perfect for building a simple yet effective gas leakage detection system.
This DIY gas alarm is an excellent way to showcase your skills in electronics, programming, and sensor integration. Whether you’re a student looking for a science exhibition project or a hobbyist interested in home automation, this project is both fun and functional.
What You’ll Need for the Gas Alarm System
Before we begin building the gas alarm, let’s take a look at the components required for this project. You’ll need the following materials:
- Arduino UNO (or any compatible Arduino board)
- MQ2 Gas Sensor
- LCD 1602 Display (with I2C module)
- Buzzer (to sound the alarm)
- Resistors (10kΩ for sensor)
- Breadboard and Jumper wires
- Power Supply (either USB or external 9V battery)
- Arduino IDE installed on your computer
If you’re new to Arduino, don’t worry! We’ll walk you through every step of the process to ensure that you can successfully complete this project.
Understanding the MQ2 Gas Sensor
The MQ2 sensor is one of the most commonly used sensors for detecting gases like smoke, carbon monoxide, methane, and propane. It works by detecting the change in electrical resistance when exposed to specific gases. The sensor uses a heating element and a semiconductor to interact with the gas particles, changing its resistance, which the Arduino reads and processes.
The MQ2 sensor has a wide range of applications in gas detection systems, smoke alarms, and safety devices. In our project, it will be used to detect dangerous gas levels and trigger an alarm to alert users.
Setting Up the Arduino and MQ2 Sensor
Now that you have all the components, it’s time to start wiring the system. Follow these steps to connect the MQ2 gas sensor and LCD 1602 (with I2C) to the Arduino UNO:
- Connect the MQ2 Sensor to the Arduino:
- VCC pin of MQ2 to 5V on Arduino
- GND pin of MQ2 to GND on Arduino
- AO pin of MQ2 to an analog pin (A1) on Arduino
- Connect the Buzzer:
- Positive leg (longer leg) of the buzzer to pin 3 of Arduino
- Negative leg (shorter leg) of the buzzer to GND on the Arduino
- Connect the LED:
- Positive leg (longer leg) of the LED to pin 2 of Arduino
- Negative leg (shorter leg) of the LED to GND on the Arduino
- Connect the LCD 1602 with I2C to Arduino:
- VCC pin of I2C module to 5V on Arduino
- GND pin of I2C module to GND on Arduino
- SDA pin of I2C module to A4 on Arduino
- SCL pin of I2C module to A5 on Arduino
Writing the Code for Gas Detection
Now it’s time to write the code. Open the Arduino IDE and paste the following code into the editor. This code will read the data from the MQ2 sensor, and if the gas concentration exceeds a preset threshold, the system will trigger the buzzer and display “GAS DETECTED” on the LCD screen.
#include <LiquidCrystal_I2C.h>
LiquidCrystal_I2C lcd(0x27, 16, 2);

#define LED 2
#define Buzzer 3
#define Sensor A1

void setup() {
  Serial.begin(9200);
  lcd.begin();
  lcd.backlight();
  pinMode(LED, OUTPUT);
  pinMode(Buzzer, OUTPUT);
}

void loop() {
  int value = analogRead(Sensor);
  lcd.setCursor(0, 0);
  lcd.print("Value :");
  lcd.print(value);
  lcd.print("  ");

  if (value > 200) {
    digitalWrite(LED, HIGH);
    digitalWrite(Buzzer, HIGH);
    lcd.setCursor(0, 1);
    lcd.print("GAS Detected!");
  } else {
    digitalWrite(LED, LOW);
    digitalWrite(Buzzer, LOW);
    lcd.setCursor(0, 1);
    lcd.print("             ");
  }
  delay(200);
}
Uploading the Code to the Arduino
Once the code is written, connect your Arduino to your computer using the USB cable. In the Arduino IDE, select your board (Arduino UNO) and the correct port. Click on the Upload button to send the code to the Arduino.
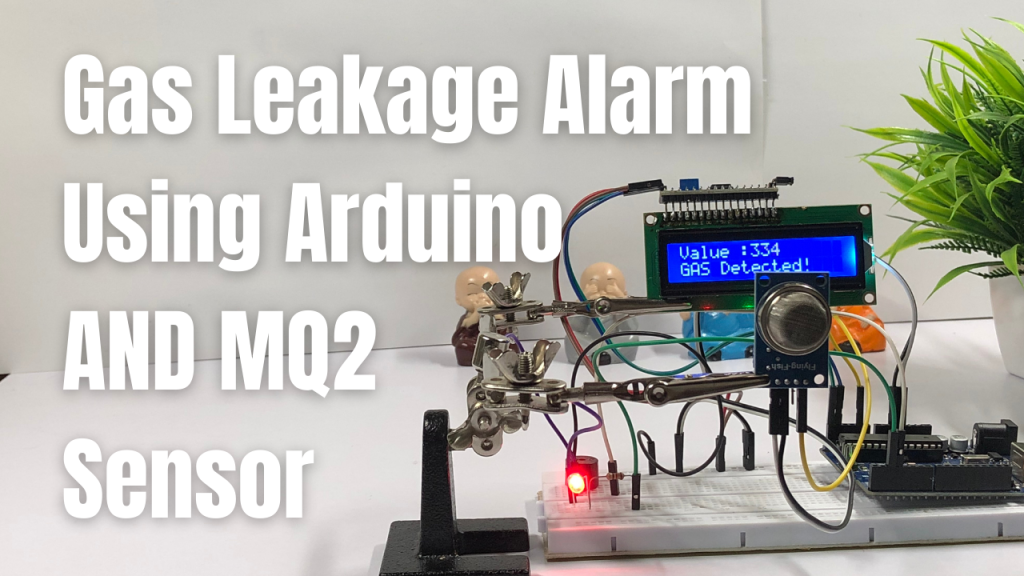
After uploading, the gas alarm system will be active. The system will continuously monitor the gas sensor. If the gas concentration exceeds the set threshold, the buzzer will sound, and the LCD screen will display “GAS DETECTED!”
Testing the Gas Alarm System
After setting up the wiring and uploading the code, it’s time to test your gas alarm system. Hold the MQ2 sensor near a source of smoke or gas (such as the exhaust of a lighter or a small amount of alcohol vapor) to see how the sensor responds.
If everything is set up correctly, the buzzer should start sounding, and the LCD should display the message “GAS DETECTED!” when the gas concentration is detected to be high. If no gas is detected, the screen will show “No Gas Detected.”
Make sure to test the system multiple times under different conditions to ensure that it’s working as expected.
Applications of the DIY Gas Alarm System
The DIY gas alarm built with Arduino and the MQ2 sensor has several potential applications. Some of the most common uses include:
- Home Safety: Detecting gas leaks from cooking or heating appliances.
- Industrial Safety: Monitoring gases in factories, laboratories, and chemical plants.
- Fire Safety: Detecting smoke and preventing fire hazards.
- Science Exhibitions: A great project to showcase how sensors can improve safety.
This project is not just for fun – it’s a practical system that could potentially save lives by alerting people to dangerous gas concentrations.
Customizing the Gas Alarm System
If you’d like to enhance your gas alarm system, there are a few customizations you can make:
- Adjusting Sensitivity: You can fine-tune the threshold value in the code to detect gases at different concentrations.
- Multiple Sensors: Integrate multiple MQ sensors to detect different gases such as methane, propane, or carbon monoxide.
- Additional Display Features: Use the LCD to display more detailed information, such as real-time gas concentration values.
Experiment with these modifications to improve your gas alarm system and make it even more efficient.
Conclusion
In this tutorial, we’ve successfully built a DIY gas alarm system using the Arduino UNO and the MQ2 Gas Sensor, along with an LCD 1602 display with an I2C module for visual output. This project is perfect for science exhibitions, school projects, or as a basic gas leak detection system at home. The MQ2 sensor provides a simple and reliable way to detect harmful gases, and Arduino makes the integration process easy for beginners and advanced users alike.
So, what are you waiting for? Start building your own gas alarm system today and show it off at your next science exhibition!